Welcome
Learn more about Philips Sonicare Teeth Whitening Kit
How to get most out of your Philips Sonicare Teeth Whitening Kit


How can we help you?
More on
Philips Sonicare Teeth Whitening Kit
Philips Sonicare Teeth Whitening Kit
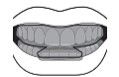
- How do I form the moldable trays?
-
Before first use, the tray needs to be fitted to your teeth. This ensures a custom fit, giving you the best whitening results. This process only needs to be completed once, after that the fitted trays can be re-used.
Note: The upper and lower trays are identical (before fitting).
To fit the trays, you will need the following:
- A large cup or medium-size bowl filled with cold water
- A large cup or medium-size bowl for hot water
- Boiling water
- Scissors (optional)
Step One
Remove two trays from the packaging and place them on a clean surface.

Step Two
Practice the fitting process before you start the actual fitting process:
- Place one tray over your upper teeth.
- Gently bite down on the tray.
- Suck the air from the tray.
- Use your fingers to apply pressure on the outside of the tray.
- Use your tongue to apply pressure on the tray from the inside, pressing the tray against your teeth.
Step Three
Fill a bowl or a large cup with at least 4 inches (10 cm) of boiling water, so the tray can be fully submerged.
WARNING: Be careful not to touch the hot water with your fingers.
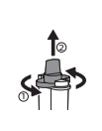
Step Four
Holding the tab, carefully submerge one tray in hot water holding the tab for 3-5 seconds. Make sure that the front surface of the tray is also submerged.
Note: Only fit one tray at a time
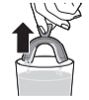
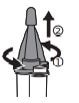
Step Five
Lift the tray vertically from the water using the tab.
Step Six
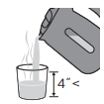
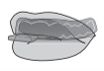
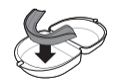
Carefully and quickly place the tray around your teeth, ensuring that the sides don’t fold in and stick together. If needed, use your fingers to spread the sides apart, to create space for your teeth.

Step Seven
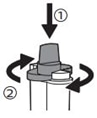
Make sure that the tray is properly centered and immediately perform the following steps at the same time:
- Gently bite down on the tray.
- Suck the air from the tray.
- Use your fingers to apply pressure on the outside of the tray.
- Use your tongue to apply pressure on the tray against your teeth.
- Hold for 20-30 seconds
Step Eight
Remove the tray and dip it into the large cup or medium-size bowl filled with cold water.
Step Nine
Place the tray back in your mouth. The tray has been correctly fitted if it fits snugly on your teeth and does not move when you open your mouth. If you are satisfied with the fit, repeat steps 3-9 to fit the other tray to your lower teeth. Use new boiling water for best results. If the trays are too loose, you can try dipping the trays in the hot water again and repeat steps 3-9 to get a better fit, or start over with a new set of trays. The starter kit comes with 4 trays, in case you need an extra pair.
Optional – Step Ten
When you have successfully fitted both trays, you can remove the tabs by cutting them off with scissors. You may also leave the tabs on to make it easier to insert and remove the trays.
Note: See the instructions for use in the whitening gel box for instructions on the whitening process.

- How do I assemble the syringe and apply the gel?
-
The following instructions require a pair of properly fitted Philips Sonicare whitening trays. Refer to the tray fitting instructions in the Philips Sonicare whitening tray box.
Step One
Floss and brush your teeth.
Step Two
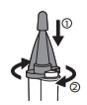
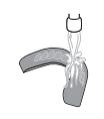
Remove the orange protective cap from the syringe by twisting it in a counterclockwise motion, and pulling it off.
WARNING: Syringes may be under slight pressure. Remove the cap carefully and point away from face.
Step Three
Place the mixing nozzle on the syringe and secure it by twisting it in a clockwise motion. Remove the small orange mixing nozzle cap from the tip of the nozzle.
Step Four
If the trays have been fitted correctly, you should see impressions of your teeth in the trays. Place a small amount of gel in each tooth impression, where the bottom and front surfaces of the trays meet.
Refer to the actual size droplet printed on the syringe to determine the correct amount of gel per tooth impression.

Step Five
Place the small orange mixing nozzle cap back on the mixing nozzle.

Step Six
Rotate the mixing nozzle counterclockwise and pull it off the syringe
Step Seven
Place the orange protective cap back onto the syringe and rotate it clockwise to ensure that the ingredients in each side of the syringe stay separate during storage. Place the syringe and mixing nozzle back into the box.
Step Eight
Place both trays with gel in your mouth. As you insert the trays, be careful not to apply too much pressure which may push the gel out of the trays.
Step Eight
Place both trays with gel in your mouth. As you insert the trays, be careful not to apply too much pressure which may push the gel out of the trays.
Other Notes
- Use extra care to avoid getting gel on your gums. Remove excess gel with a cotton swab or soft dry toothbrush, to avoid causing gum irritation.
- Bubbling within the trays is normal.
- Do not eat, drink or smoke while wearing trays.
- How do I clean and store the whitening trays after use?
-
Step One
When you are done with your whitening treatment, remove the trays from your mouth, rinse your mouth with water and brush your teeth with a soft-bristled toothbrush to remove any excess gel.

Step Two
Clean the trays by rinsing them under cold tap water. Do not use any soap or other cleaning agents. If necessary, use a toothbrush to remove residual gel.
WARNING: After forming your trays, do not use hot water to clean them and do not clean trays in the dishwasher. Doing so will deform the trays.
Step Three
Place the trays in the storage case and allow the trays to air-dry before closing the storage case. Store the trays and the syringes in a cool, dry place between 59 °F and 77 °F (15 °C and 25 °C). Do not refrigerate or freeze the gel.
Step Four
Avoid staining foods, drinks (such as coffee, tea and red wine) and tobacco for 30 minutes after each treatment.
Step Five
Continue good oral hygiene by brushing twice a day and flossing.
It is normal to see dark colors in trays where you have amalgam (silver) fillings.
- Will the gel make my teeth sensitive?
-
Some users may experience increased tooth sensitivity to cold during or after whitening treatment, while others may have non-specific sensitivity or pain in their teeth, gums, tongue, lips or throat. Symptoms should subside within 1 to 3 days.
If you experience tooth sensitivity, try whitening every other or every third day. If you are currently using Advanced gel (9.5% hydrogen peroxide), consider purchasing a Caring gel refill kit (6% hydrogen peroxide) for a more gradual and comfortable whitening experience. Gel refills can be purchased separately.
An over-the-counter desensitizing toothpaste with 5 % potassium nitrate (KNO3) can be used to treat the tooth sensitivity, adhering to the respective toothpaste instructions.
A Non-Steroidal Anti-Inflammatory Drug may be taken for pain, adhering to the respective drug’s instructions for use as well as your doctor’s recommendation for acceptable use.
- Will I experience gum irritation?
-
If whitening gel comes in contact with your gums, it may cause gum irritation. This includes redness, a burning feeling, or white spots on the gums. In most cases, this subsides in a few days.
If you see any gel on your gums, or notice a burning feeling, use a cotton swab or soft bristled toothbrush to remove any excess gel from your gums. Be careful not to overfill the trays, refer to the actual size droplet indicated on the syringe for the correct amount of gel per tooth. Teeth whiten as the gel is absorbed into the tooth and whitens from the inside, so it is not important to cover the entire tooth.
If you still have gum irritation or sensitivity, treatment should be paused until the irritation is gone. Resume treatment with using smaller dots of gel to reduce contact with you gums. Please note results may vary using less gel. If the discomfort continues try shorter, less frequent treatments until the desired whitening effect has been achieved. If irritation still persists, discontinue the treatment and consult your dentist.
- My gums turned a little white after teeth whitening. Is this normal?
-
If whitening gel comes in contact with your gums, it may cause gum irritation. This includes redness, a burning feeling, or white spots on the gums. In most cases, this subsides in a few days. To prevent this, wipe off excess gel or use smaller droplets of gel.
")
")