How do I prepare and apply the gel?
Published on 19 January 2024
The following instructions require a pair of properly fitted Philips Sonicare whitening trays.
Step One
Floss and brush your teeth.
Step Two
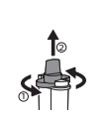
Remove the orange protective cap from the syringe by twisting it in a counterclockwise motion and pulling it off.
WARNING: Point the tip away from yourself while removing the cap, as the contents may be under pressure.
WARNING: Point the tip away from yourself while removing the cap, as the contents may be under pressure.
Step Three
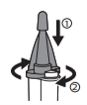
Place the mixing nozzle on the syringe and secure it by twisting it in a clockwise motion. Remove the tip protector from the tip of the nozzle.
Step Four
Use the included card to practice dispensing the correct amount of gel per tooth impression. Dispose of the card in the trash after dispensing gel on it.
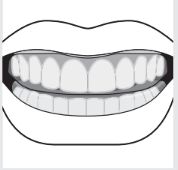
Step Five
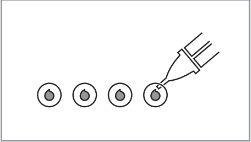
If the trays have been fitted correctly, you should see impressions of your teeth in the trays. Place a small amount of gel in each tooth impression, where the bottom and front surfaces of the trays meet.

Note: Image is not scale; refer to the Quick Start Guide or Practice Card for the correct dot size.
Note: The whitening gel is absorbed into the tooth and whitens from the inside, so it is not important to cover the entire tooth with whitening gel. If the gel touches your gums or you feel a burning sensation, remove the trays and brush the gel off your gums and use less gel for your next treatment.
Warning: Do not overfill your tray with gel, as this may cause gum irritation when excess gel gets pushed out of the trays and onto your gums.
Step Six
Place the small orange mixing nozzle cap back on the mixing nozzle.

Step Seven
Rotate the mixing nozzle counterclockwise and pull it off the syringe.

Step Eight
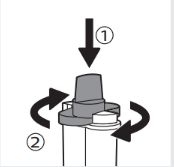
Place the orange protective cap back onto the syringe and rotate it clockwise to ensure that the ingredients on each side of the syringe stay separate during storage. Place the syringe and mixing nozzle back into the box.
Step 9
Place both trays with gel in your mouth. As you insert the trays, be careful not to apply too much pressure, which may push the gel out of the trays.
- Use extra care to avoid getting gel on your gums.
- Remove excess gel with a cotton swab or soft dry toothbrush to avoid causing gum irritation.
- Bubbling within the trays is normal.
- Do not eat, drink, or smoke while wearing trays.
")
")